Tuesday, March 23, 2010

Easter Egg Tree

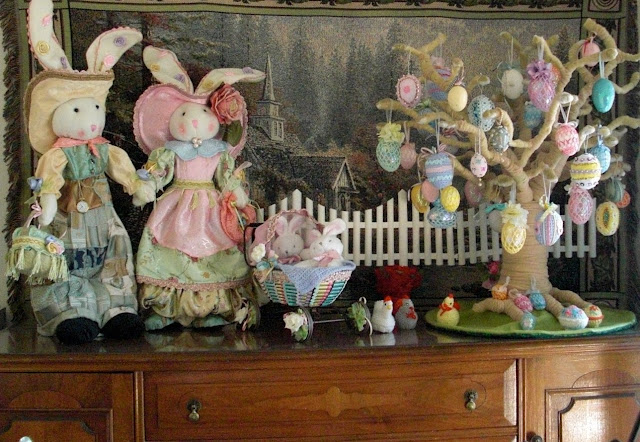
The Easter Egg Ornament Tree
When I was small, the public library was the center of my life.  Every Easter, the librarians would take a small, dried tree branch, cement it in a pot, and hang these gorgeous hand-painted Easter eggs on it.  Later, I visited Ukraine (not "the" Ukraine), and I learned these eggs were called "pisanky."

I've always wanted to make a tree to display easter eggs, and I have quite the collection of hand made eggs to display: some styrofoam covered with fabric; some crocheted designs over your run-of-the-mill plastic, fillable Easter eggs; some from various projects I did when I was very young, like my interpretive sea shell egg.  The tree though, was a different matter.

The easiest way to make a display tree is still finding a viable dried branch and setting it with plaster of Paris in an empty flower pot.  If you put a piece of florist's foam at the bottom, it makes it easier for the branch to stay in place while the plaster dries.

But, once you do that, once you've got your eggs displayed and Easter comes and goes, then you've got this tree branch you need to either store, or do something with.  (I could already picture myself getting scratched when reaching to the back of the closet.)

I'm a fabric gal.  I like soft, bendable things.  I'm also the daughter of an inventor/engineer, and my brain won't let a construction project rest until I solve its puzzle.  So, down the road of making an Easter egg ornament tree I went.

Well, it needed a base.  I already knew the branches were going to be formed by a bailing wire skeleton wrapped in some sort of fabric, but those branches needed something to be anchored to.  My two choices were either a used paper towel stand rack, or making my own from a piece of wood.  I chose the latter:


For those of you inclined toward a coping saw, that's a 10 inch round with 6 stainless steel spikes imbedded in it.  If you have a thrift store nearby, or one of those discount stores that sells home goods, a paper towel rack with a nice weighted base will work just as well.  What you need is something to wrap the bailing wire around, like this:


I also padded the base and wrapped it with some tan fabric, then pulled it together like a little purse to cover the wood.
I built up the thickness of the branches and the trunk first with some black yarn, then with strips of polar fleece:


I used some floral wire to make roots for my tree because it was easier to bend:


And I cut the polar fleece strips to cover the roots a little bit narrower than the trunk strips, so the roots would look slightly different:


Close to completion, and here is how it looks:


Post completion note:  After I got the eggs hanging on it, I got to thinking about what I was going to do with the tree after Easter.  I could put it in the closet if I wanted to.  The branches were bendable, and it certainly would lay flat enough to fit in a suitcase.  I know this because I had to put it in one to take it with me to Seattle from Los Angeles (long story).


But, it seemed like such a waist, like another thing to keep track of in the back of a closet, so I started thinking about how to let the tree change as the seasons and my home did.  Then it hit me: velcro.


I took the fuzzy side (loop side) of some velcro tape, and I started wrapping the branches with it.  It blended pretty well with the color of the fleece.  I'm saving the hook side to make leaves, snow, autumn leaves, etc.  We'll see how it goes.


No comments:

Post a Comment

Tuesday, March 23, 2010

Easter Egg Tree

The Easter Egg Ornament Tree
When I was small, the public library was the center of my life.  Every Easter, the librarians would take a small, dried tree branch, cement it in a pot, and hang these gorgeous hand-painted Easter eggs on it.  Later, I visited Ukraine (not "the" Ukraine), and I learned these eggs were called "pisanky."

I've always wanted to make a tree to display easter eggs, and I have quite the collection of hand made eggs to display: some styrofoam covered with fabric; some crocheted designs over your run-of-the-mill plastic, fillable Easter eggs; some from various projects I did when I was very young, like my interpretive sea shell egg.  The tree though, was a different matter.

The easiest way to make a display tree is still finding a viable dried branch and setting it with plaster of Paris in an empty flower pot.  If you put a piece of florist's foam at the bottom, it makes it easier for the branch to stay in place while the plaster dries.

But, once you do that, once you've got your eggs displayed and Easter comes and goes, then you've got this tree branch you need to either store, or do something with.  (I could already picture myself getting scratched when reaching to the back of the closet.)

I'm a fabric gal.  I like soft, bendable things.  I'm also the daughter of an inventor/engineer, and my brain won't let a construction project rest until I solve its puzzle.  So, down the road of making an Easter egg ornament tree I went.

Well, it needed a base.  I already knew the branches were going to be formed by a bailing wire skeleton wrapped in some sort of fabric, but those branches needed something to be anchored to.  My two choices were either a used paper towel stand rack, or making my own from a piece of wood.  I chose the latter:


For those of you inclined toward a coping saw, that's a 10 inch round with 6 stainless steel spikes imbedded in it.  If you have a thrift store nearby, or one of those discount stores that sells home goods, a paper towel rack with a nice weighted base will work just as well.  What you need is something to wrap the bailing wire around, like this:


I also padded the base and wrapped it with some tan fabric, then pulled it together like a little purse to cover the wood.
I built up the thickness of the branches and the trunk first with some black yarn, then with strips of polar fleece:


I used some floral wire to make roots for my tree because it was easier to bend:


And I cut the polar fleece strips to cover the roots a little bit narrower than the trunk strips, so the roots would look slightly different:


Close to completion, and here is how it looks:


Post completion note:  After I got the eggs hanging on it, I got to thinking about what I was going to do with the tree after Easter.  I could put it in the closet if I wanted to.  The branches were bendable, and it certainly would lay flat enough to fit in a suitcase.  I know this because I had to put it in one to take it with me to Seattle from Los Angeles (long story).


But, it seemed like such a waist, like another thing to keep track of in the back of a closet, so I started thinking about how to let the tree change as the seasons and my home did.  Then it hit me: velcro.


I took the fuzzy side (loop side) of some velcro tape, and I started wrapping the branches with it.  It blended pretty well with the color of the fleece.  I'm saving the hook side to make leaves, snow, autumn leaves, etc.  We'll see how it goes.


No comments:

Post a Comment